Intro 
Why Would We Want to Split Data Into Separate Tables? ![]()
So above, we understand that all of the information related to an account is not in the orders table, but why not? Watch the below video ![]() to find out!
to find out!
Database Normalization
When creating a database, it is really important to think about how data will be stored. This is known as normalization, and it is a huge part of most SQL classes. If you are in charge of setting up a new database, it is important to have a thorough understanding of database normalization.
There are essentially three ideas that are aimed at database normalization:
- Are the tables storing logical groupings of the data?
- Can I make changes in a single location, rather than in many tables for the same information?
- Can I access and manipulate data quickly and efficiently?
This is discussed in detail here.
However, most analysts are working with a database that was already set up with the necessary properties in place. As analysts of data, you don’t really need to think too much about data normalization. You just need to be able to pull the data from the database, so you can start making insights. This will be our focus in this lesson.
Introduction to JOINs
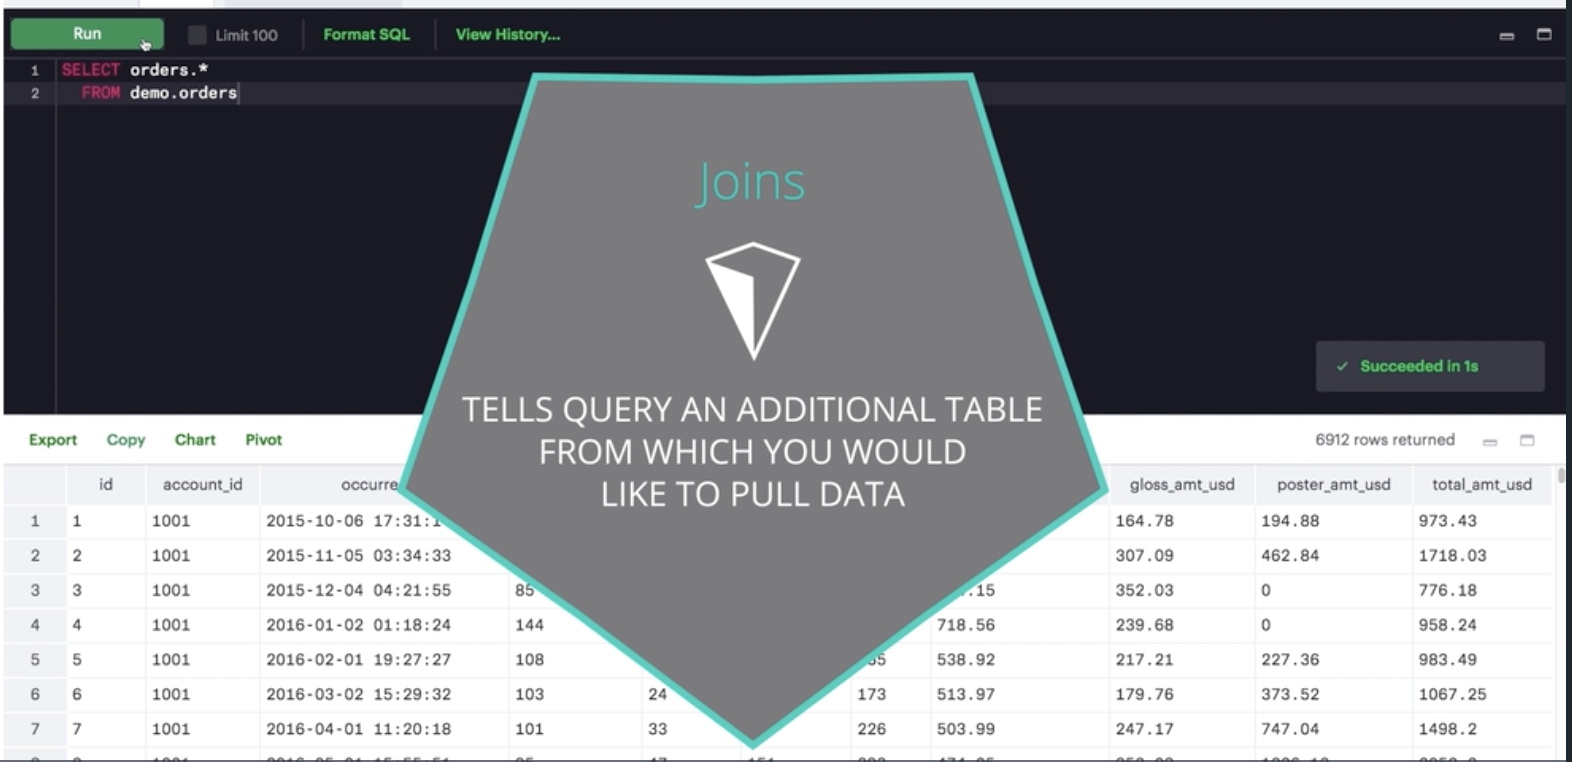
This entire lesson will be focused on JOINs. The whole purpose of JOIN statements is to allow us to pull data from more than one table at a time.
Again - JOINs are useful for allowing us to pull data from multiple tables. This is both simple and powerful all at the same time.
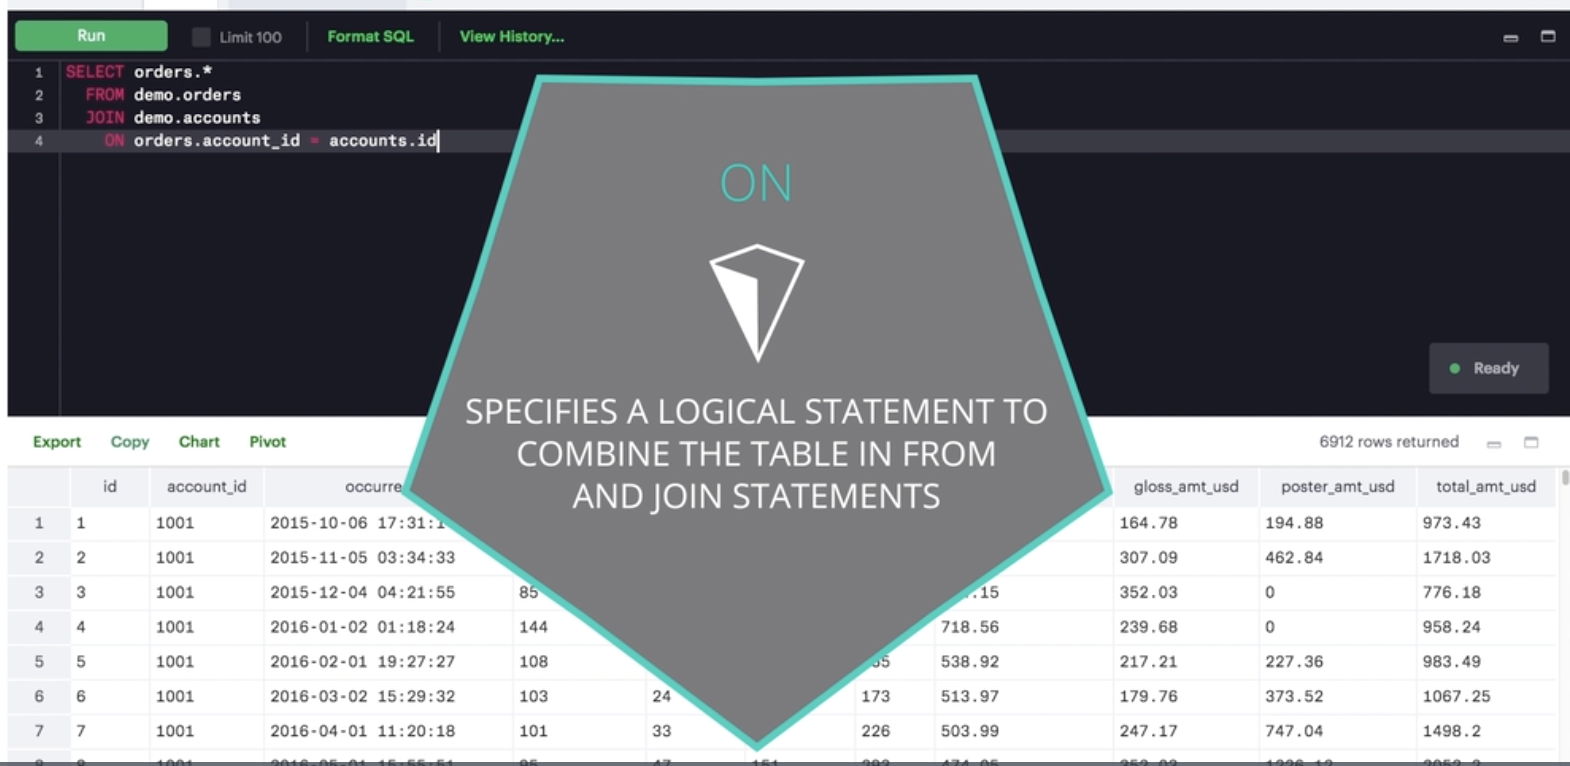
With the addition of the JOIN statement to our toolkit, we will also be adding the ON statement.
We use ON clause to specify a JOIN condition which is a logical statement to combine the table in FROM and JOIN statements.
Write Your First JOIN
Below we see an example of a query using a JOIN statement. Let’s discuss what the different clauses of this query mean.
  SELECT orders.*
  FROM orders
  JOIN accounts
  ON orders.account_id = accounts.id;
As we’ve learned, the SELECT clause indicates which column(s) of data you’d like to see in the output (For Example, orders.* gives us all the columns in orders table in the output). The FROM clause indicates the first table from which we’re pulling data, and the JOIN indicates the second table. The ON clause specifies the column on which you’d like to merge the two tables together. Try running this query yourself below.
What to Notice We are able to pull data from two tables:
- orders
- accounts
Above, we are only pulling data from the orders table since in the SELECT statement we only reference columns from the orders table.
The ON statement holds the two columns that get linked across the two tables. This will be the focus in the next concepts.
Additional Information
If we wanted to only pull individual elements from either the orders or accounts table, we can do this by using the exact same information in the FROM and ON statements. However, in your SELECT statement, you will need to know how to specify tables and columns in the SELECT statement:
- The table name is always before the period.
- The column you want from that table is always after the period.
For example, if we want to pull only the account name and the dates in which that account placed an order, but none of the other columns, we can do this with the following query:
  SELECT  accounts.name,
          orders.occurred_at
  FROM orders
  JOIN accounts
  ON orders.account_id = accounts.id;
This query only pulls two columns, not all the information in these two tables. Alternatively, the below query pulls all the columns from both the accounts and orders table
  SELECT *
  FROM orders
  JOIN accounts
  ON orders.account_id = accounts.id;
And the first query you ran pull all the information from only the orders table:
  SELECT orders.*
  FROM orders
  JOIN accounts
  ON orders.account_id = accounts.id;
Joining tables allows you access to each of the tables in the SELECT statement through the table name, and the columns will always follow a . after the table name.
Exercises:
- Try pulling all the data from the accounts table, and all the data from the orders table.
SELECT accounts.*, orders.* FROM accounts JOIN orders ON accounts.id = orders.account_id; - Try pulling standard_qty, gloss_qty, and poster_qty from the orders table, and the website and the primary_poc from the accounts table.
  SELECT	orders.standard_qty,
  		orders.gloss_qty,
       orders.poster_qty,
       accounts.website,
       accounts.primary_poc
  FROM orders
  JOIN accounts
  ON orders.account_id = accounts.id;
Notice that we need to specify every table a column comes from in the SELECT statement.
Entity Relationship Diagrams
From the last lesson, you might remember that an entity relationship diagram (ERD) is a common way to view data in a database. It is also a key element to understanding how we can pull data from multiple tables.
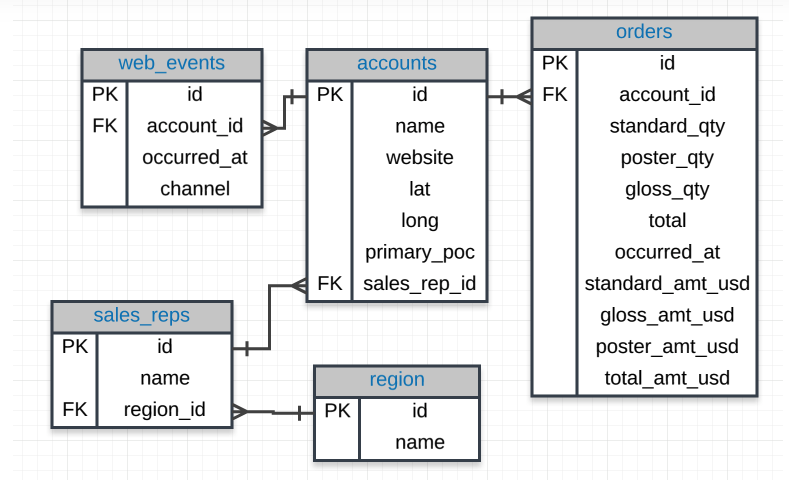
It will be beneficial to have an idea of what the ERD looks like for Parch & Posey handy, so I have posted it again below. You might even print a copy to have with you as you work through the exercises in the remaining content.
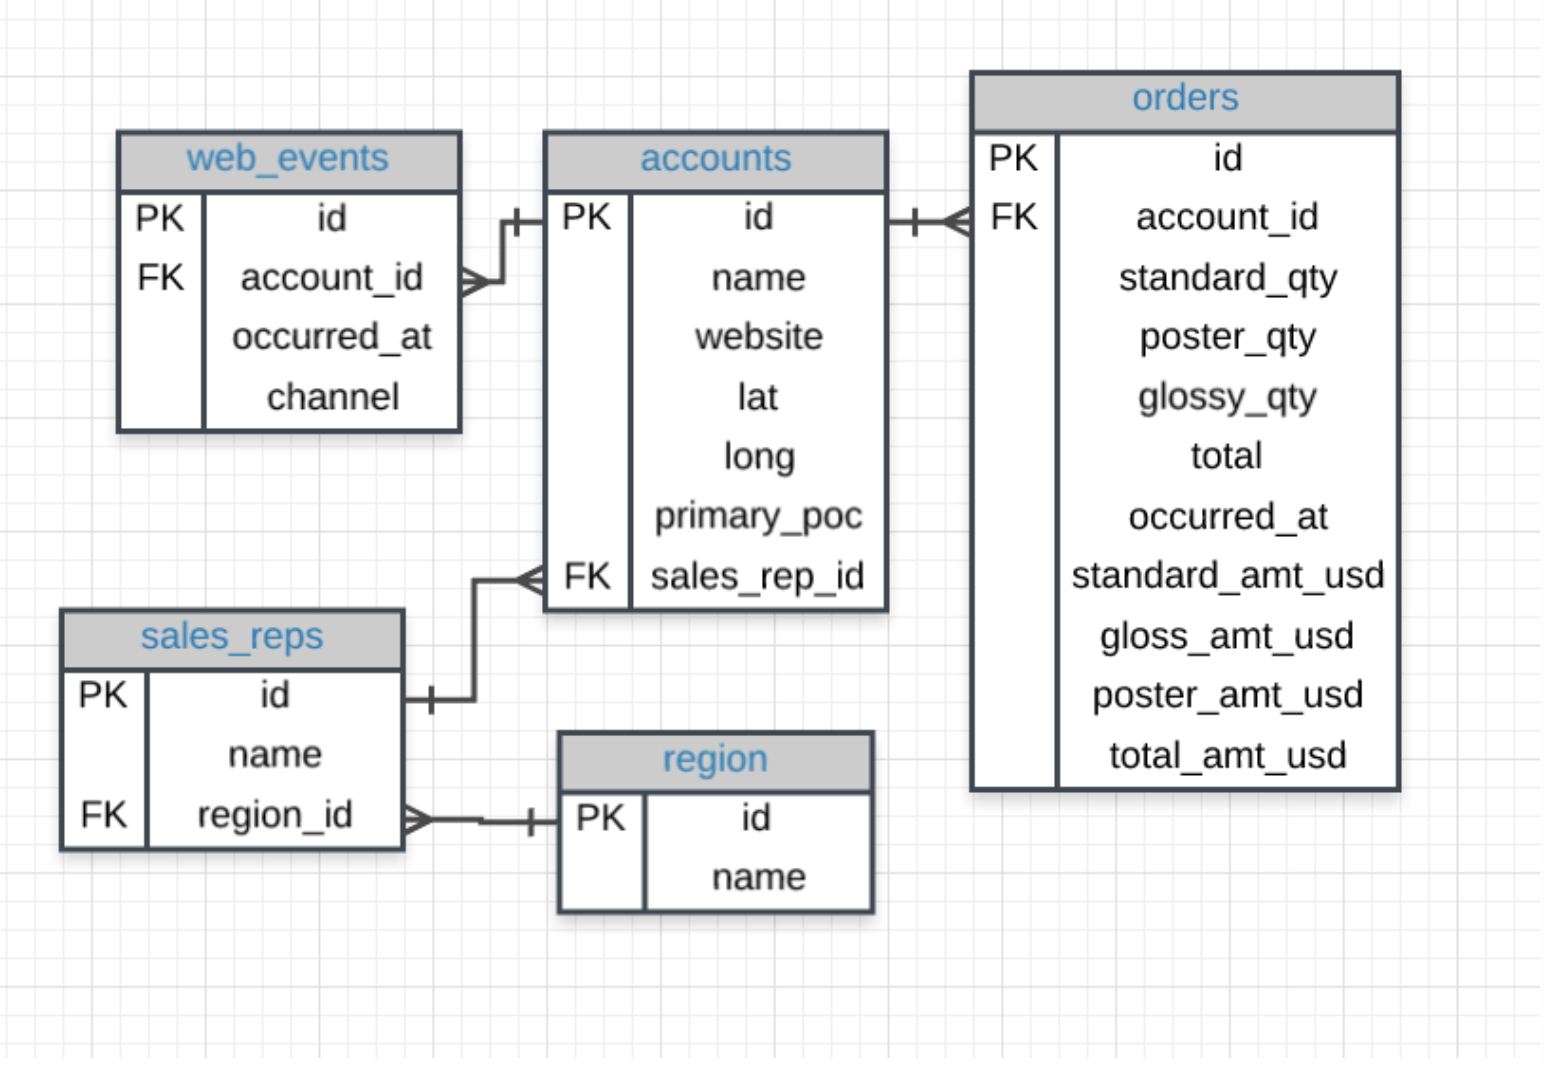
Tables & Columns In the Parch & Posey database there are 5 tables:
web_events accounts orders sales_reps region You will notice some of the columns in the tables have PK or FK next to the column name, while other columns don’t have a label at all.
If you look a little closer, you might notice that the PK is associated with the first column in every table. The PK here stands for primary key. A primary key exists in every table, and it is a column that has a unique value for every row.
If you look at the first few rows of any of the tables in our database, you will notice that this first, PK, column is always unique. For this database it is always called id, but that is not true of all databases.
You can explore the database ERD below by clicking on the table names in the left menu of the workspace below. Or you can query the first row of these tables in the workspace to see some examples of the content inside of each field.
Keys
Primary Key (PK)
A primary key is a unique column in a particular table. This is the first column in each of our tables. Here, those columns are all called id, but that doesn’t necessarily have to be the name. It is common that the primary key is the first column in our tables in most databases.
The primary key is a single column that must exist in each table of a database. Again, these rules are true for most major databases, but some databases may not enforce these rules.
Foreign Key (FK)
A foreign key is a column in one table that is a primary key in a different table. We can see in the Parch & Posey ERD that the foreign keys are:
- region_id
- account_id
- sales_rep_id
Though all of the above only have one foreign key, a table can actually have multiple foreign keys (unlike primary keys).
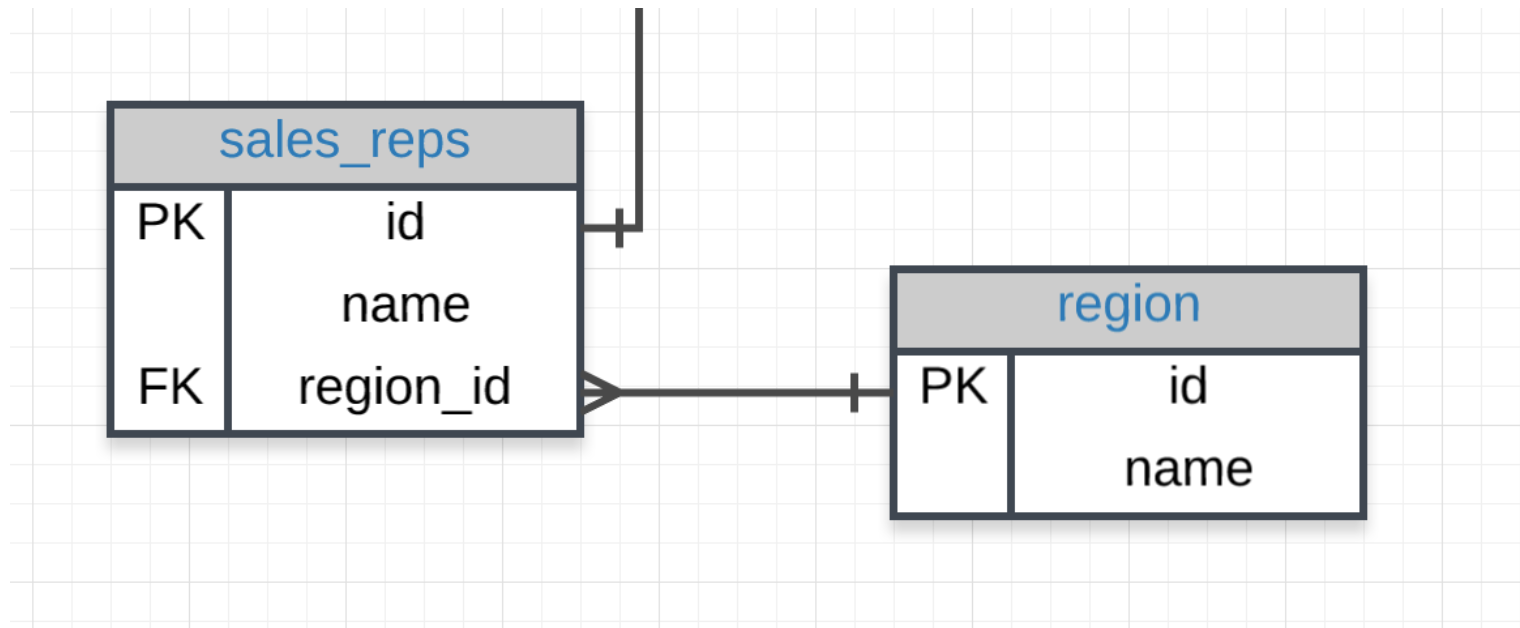
Each of these is linked to the primary key of another table. An example is shown in the image below:
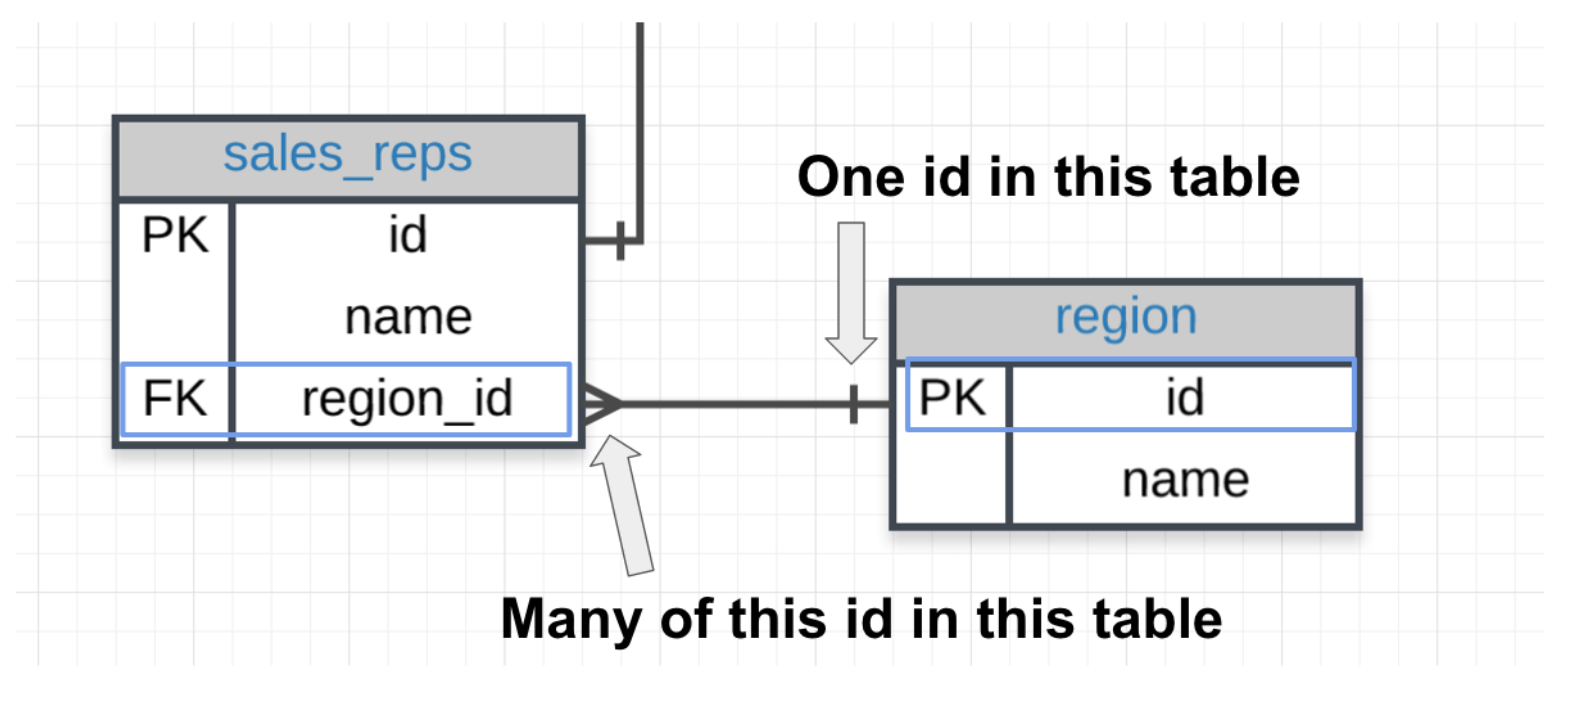
Primary - Foreign Key Link In the above image you can see that:
- The region_id is the foreign key.
- The region_id is linked to id - this is the primary-foreign key link that connects these two tables.
- The crow’s foot shows that the FK can actually appear in many rows in the sales_reps table.
- While the single line is telling us that the PK shows that id appears only once per row in this table.
JOIN Revisited
Let’s look back at the first JOIN you wrote.
  SELECT orders.*
  FROM orders
  JOIN accounts
  ON orders.account_id = accounts.id;
Here is the ERD for these two tables:
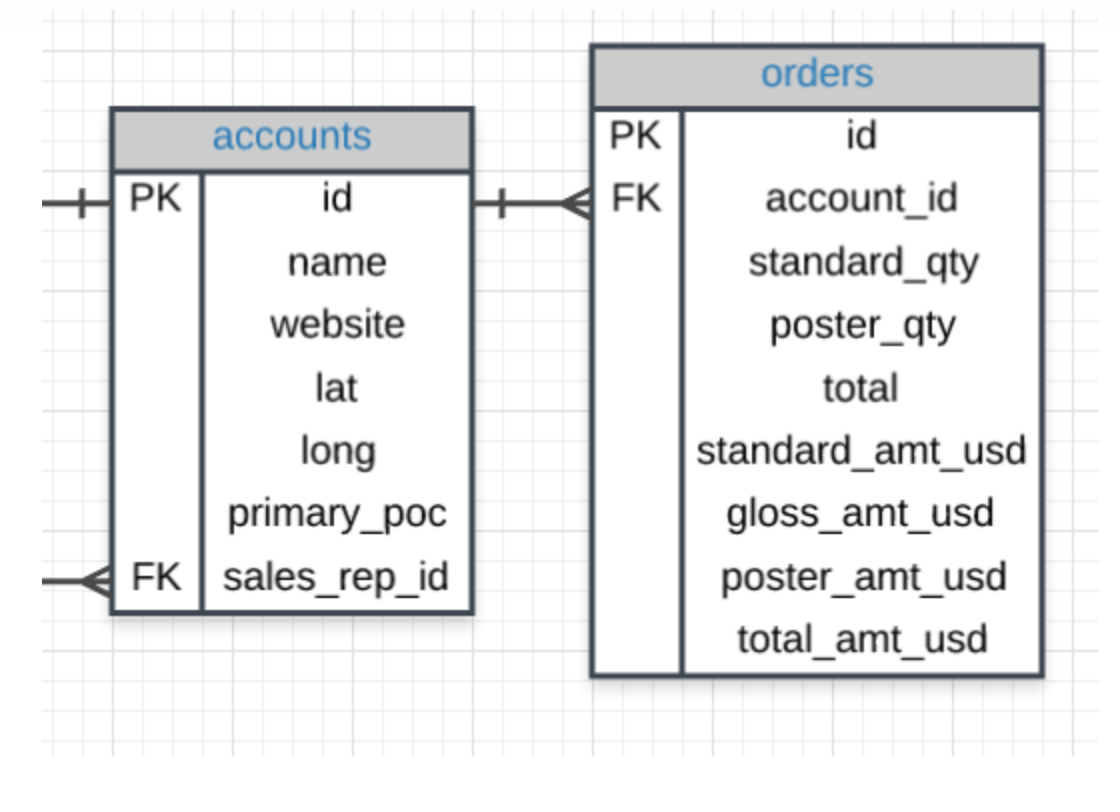
Notice
Notice our SQL query has the two tables we would like to join - one in the FROM and the other in the JOIN. Then in the ON, we will ALWAYs have the PK equal to the FK:
The way we join any two tables is in this way: linking the PK and FK (generally in an ON statement).
JOIN More than Two Tables
This same logic can actually assist in joining more than two tables together. Look at the three tables below.
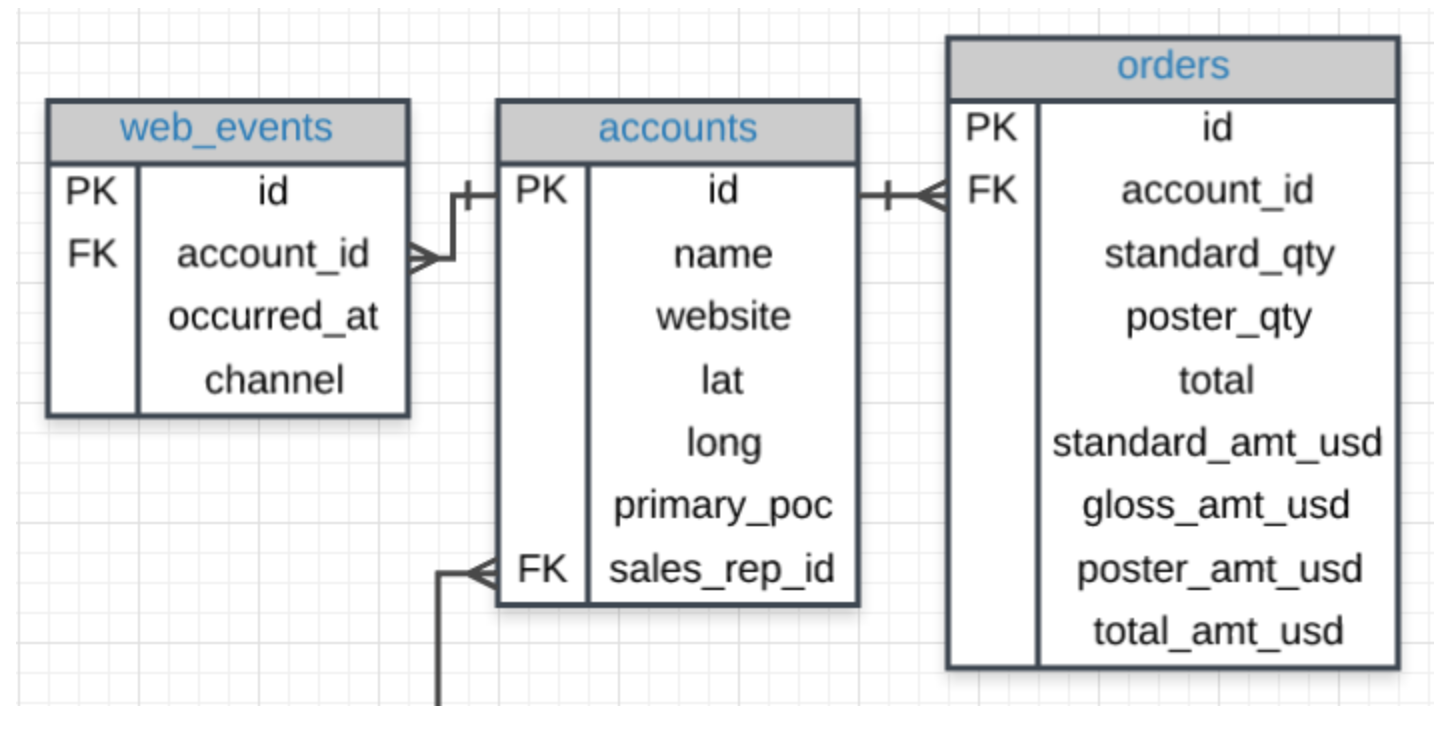
The Code
If we wanted to join all three of these tables, we could use the same logic. The code below pulls all of the data from all of the joined tables.
  SELECT *
  FROM web_events
  JOIN accounts
  ON web_events.account_id = accounts.id
  JOIN orders
  ON accounts.id = orders.account_id
Alternatively, we can create a SELECT statement that could pull specific columns from any of the three tables. Again, our JOIN holds a table, and ON is a link for our PK to equal the FK.
To pull specific columns, the SELECT statement will need to specify the table that you are wishing to pull the column from, as well as the column name. We could pull only three columns in the above by changing the select statement to the below, but maintaining the rest of the JOIN information:
SELECT web_events.channel, accounts.name, orders.total
We could continue this same process to link all of the tables if we wanted. For efficiency reasons, we probably don’t want to do this unless we actually need information from all of the tables.
Alias
When we JOIN tables together, it is nice to give each table an alias. Frequently an alias is just the first letter of the table name. You actually saw something similar for column names in the Arithmetic Operators concept.
Example:
  FROM tablename AS t1
  JOIN tablename2 AS t2
Before, you saw something like:
SELECT col1 + col2 AS total, col3
Frequently, you might also see these statements without the AS statement. Each of the above could be written in the following way instead, and they would still produce the exact same results:
  FROM tablename t1
  JOIN tablename2 t2
and
SELECT col1 + col2 total, col3
Aliases for Columns in Resulting Table
While aliasing tables is the most common use case. It can also be used to alias the columns selected to have the resulting table reflect a more readable name.
Example:
  Select t1.column1 aliasname, t2.column2 aliasname2
  FROM tablename AS t1
| aliasname | aliasname2 |
| example row | example row |
| example row | example row |
Exercises:
- Provide a table for all web_events associated with account name of Walmart. There should be three columns. Be sure to include the primary_poc, time of the event, and the channel for each event. Additionally, you might choose to add a fourth column to assure only Walmart events were chosen.
SELECT a.primary_poc, w.occurred_at, w.channel FROM accounts a JOIN web_events w ON w.account_id = a.id WHERE name = 'Walmart' - Provide a table that provides the region for each sales_rep along with their associated accounts. Your final table should include three columns: the region name, the sales rep name, and the account name. Sort the accounts alphabetically (A-Z) according to account name.
SELECT sales_reps.name rep, accounts.name account_name, region.name region FROM accounts JOIN sales_reps ON accounts.sales_rep_id = sales_reps.id JOIN region ON sales_reps.region_id = region.id ORDER BY account_name; - Provide the name for each region for every order, as well as the account name and the unit price they paid (total_amt_usd/total) for the order. Your final table should have 3 columns: region name, account name, and unit price. A few accounts have 0 for total, so I divided by (total + 0.01) to assure not dividing by zero.
  SELECT r.name region, a.name account,
      o.total_amt_usd/(o.total + 0.01) unit_price
  FROM region r
  JOIN sales_reps s
  ON s.region_id = r.id
  JOIN accounts a
  ON a.sales_rep_id = s.id
  JOIN orders o
  ON o.account_id = a.id;
We can simply write our alias directly after the column name (in the SELECT) or table name (in the FROM or JOIN) by writing the alias directly following the column or table we would like to alias. This will allow you to create clear column names even if calculations are used to create the column, and you can be more efficient with your code by aliasing table names.
Expert Tip on JOINs
You have had a bit of an introduction to these one-to-one and one-to-many relationships when we introduced PKs and FKs. Notice, traditional databases do not allow for many-to-many relationships, as these break the schema down pretty quickly. A very good answer is provided here.
The types of relationships that exist in a database matter less to analysts, but you do need to understand why you would perform different types of JOINs, and what data you are pulling from the database. These ideas will be expanded upon in the next concepts.
LEFT and RIGHT JOINs
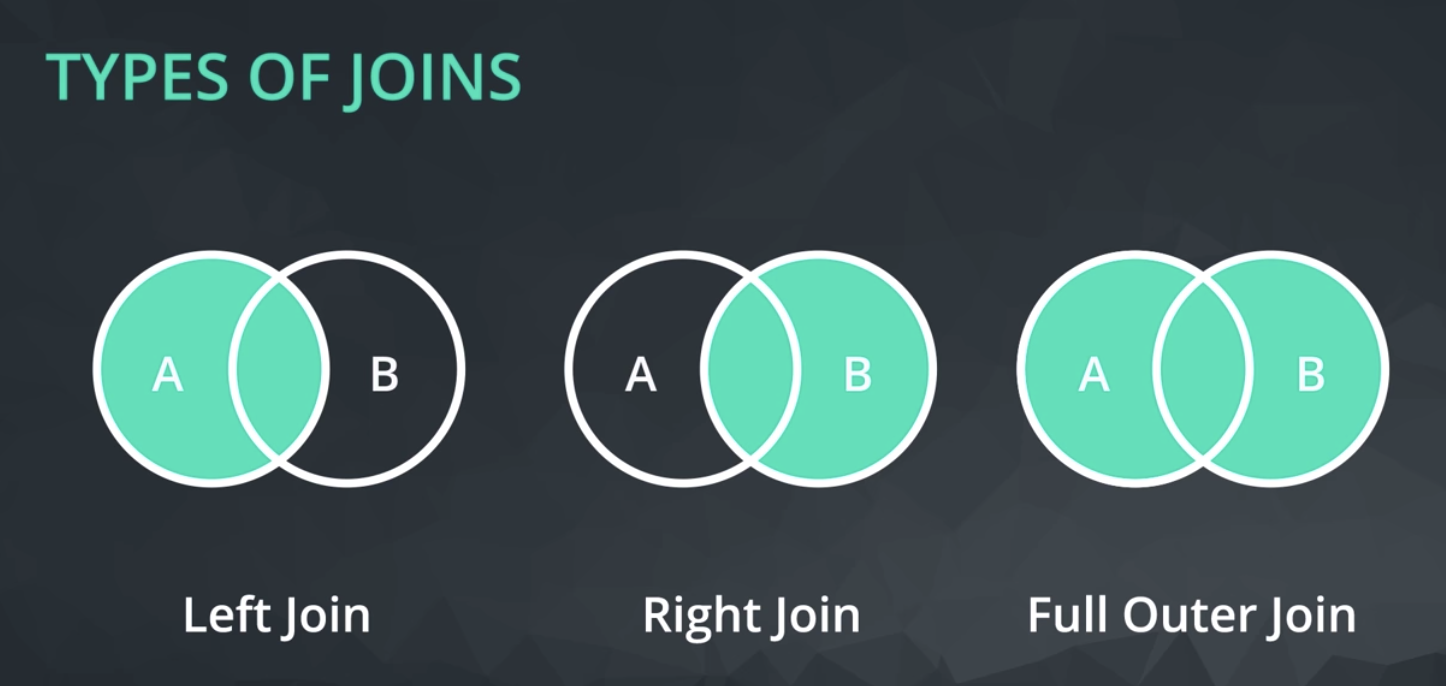
Inner Joins

LEFT and RIGHT JOINs
JOINs Notice each of these new JOIN statements pulls all the same rows as an INNER JOIN, which you saw by just using JOIN, but they also potentially pull some additional rows.
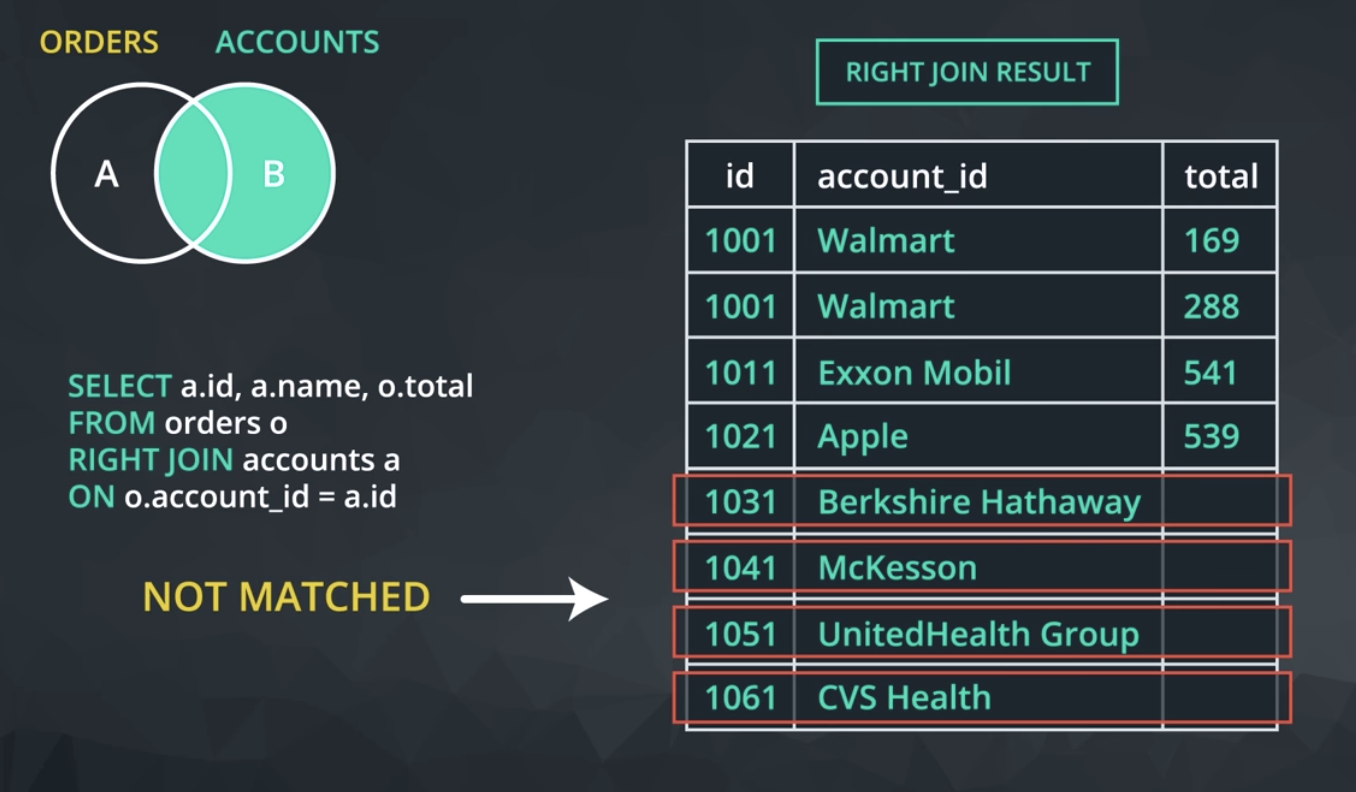
If there is not matching information in the JOINed table, then you will have columns with empty cells. These empty cells introduce a new data type called NULL. You will learn about NULLs in detail in the next lesson, but for now you have a quick introduction as you can consider any cell without data as NULL.
INNER JOINs
Notice every JOIN we have done up to this point has been an INNER JOIN. That is, we have always pulled rows only if they exist as a match across two tables.
Our new JOINs allow us to pull rows that might only exist in one of the two tables. This will introduce a new data type called NULL. This data type will be discussed in detail in the next lesson.
Quick Note
You might see the SQL syntax of
LEFT OUTER JOIN or RIGHT OUTER JOIN
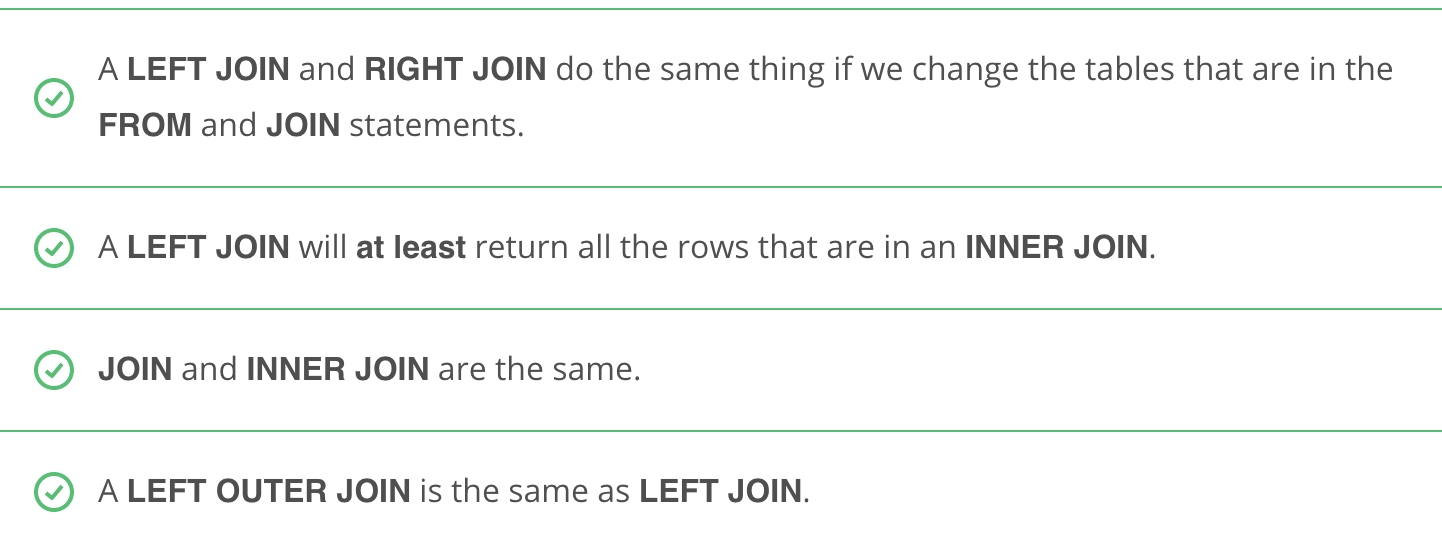
These are the exact same commands as the LEFT JOIN and RIGHT JOIN we learned about in the previous video.
OUTER JOINS The last type of join is a full outer join. This will return the inner join result set, as well as any unmatched rows from either of the two tables being joined.
Again this returns rows that do not match one another from the two tables. The use cases for a full outer join are very rare.
You can see examples of outer joins at the link here and a description of the rare use cases here. We will not spend time on these given the few instances you might need to use them.
Similar to the above, you might see the language FULL OUTER JOIN, which is the same as OUTER JOIN.
LEFT and RIGHT JOIN Excercises
INNER JOIN Question
The questions are aimed to assure you have a conceptual idea of what is happening with LEFT and INNER JOINs before you need to use them for more difficult problems.
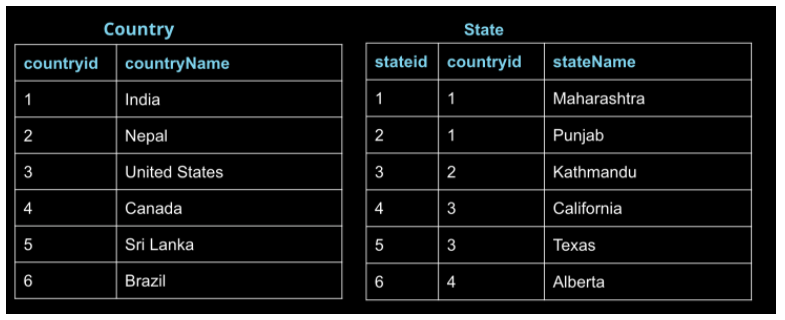
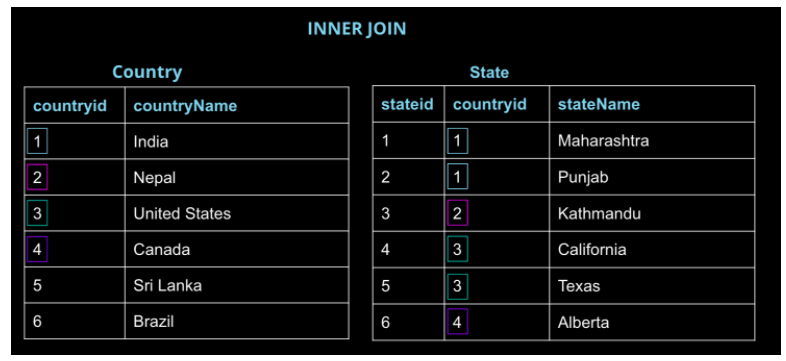
For an INNER JOIN like the one here:
  SELECT c.countryid, c.countryName, s.stateName
  FROM Country c
  JOIN State s
  ON c.countryid = s.countryid;
We are essentially JOINing the matching PK-FK links from the two tables, as shown in the below image.
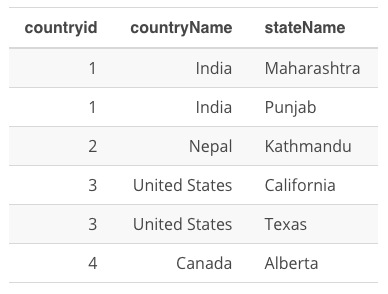
The resulting table will look like:
LEFT JOIN Question
The questions are aimed to assure you have a conceptual idea of what is happening with LEFT and INNER JOINs before you need to use them for more difficult problems.
For a LEFT JOIN like the one here:
  SELECT c.countryid, c.countryName, s.stateName
  FROM Country c
  LEFT JOIN State s
  ON c.countryid = s.countryid;
We are essentially JOINing the matching PK-FK links from the two tables, as we did before, but we are also pulling all the additional rows from the Country table even if they don’t have a match in the State table. Therefore, we obtain all the rows of the INNER JOIN, but we also get additional rows from the table in the FROM.
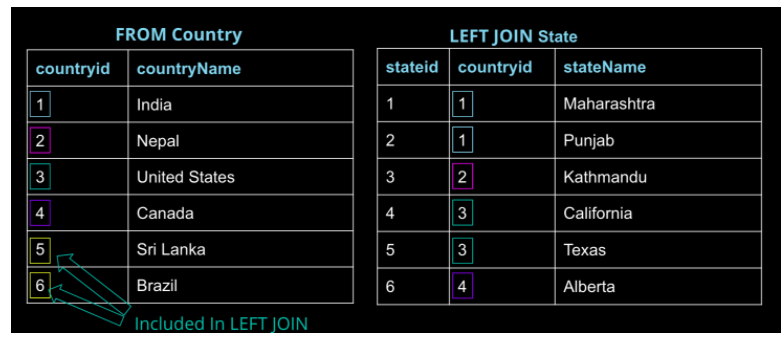
The resulting table will look like:
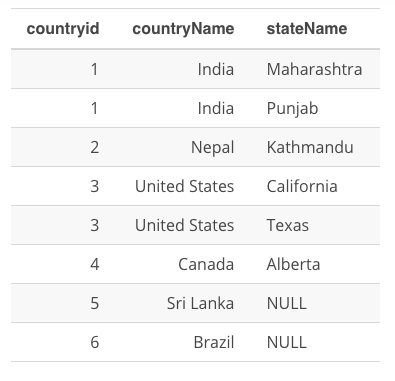
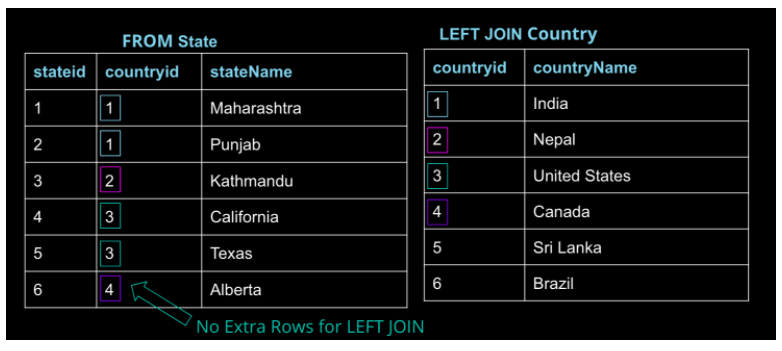
FINAL LEFT JOIN Note
If we were to flip the tables, we would actually obtain the same exact result as the JOIN statement:
  SELECT c.countryid, c.countryName, s.stateName
  FROM State s
  LEFT JOIN Country c
  ON c.countryid = s.countryid;
This is because if State is on the LEFT table, all of the rows exist in the RIGHT table again.
The resulting table will look like:

JOINs and Filtering
A simple rule to remember this is that, when the database executes this query, it executes the join and everything in the ON clause first. Think of this as building the new result set. That result set is then filtered using the WHERE clause.
The fact that this example is a left join is important. Because inner joins only return the rows for which the two tables match, moving this filter to the ON clause of an inner join will produce the same result as keeping it in the WHERE clause.
Exercises:
- Provide a table that provides the region for each sales_rep along with their associated accounts. This time only for the Midwest region. Your final table should include three columns: the region name, the sales rep name, and the account name. Sort the accounts alphabetically (A-Z) according to account name.
SELECT s.name sales_reps, a.name acct_name, r.name region_name FROM accounts a JOIN sales_reps s ON a.sales_rep_id = s.id JOIN region r ON s.region_id = r.id AND r.name = 'Midwest' ORDER BY a.name; - Provide a table that provides the region for each sales_rep along with their associated accounts. This time only for accounts where the sales rep has a first name starting with S and in the Midwest region. Your final table should include three columns: the region name, the sales rep name, and the account name. Sort the accounts alphabetically (A-Z) according to account name.
SELECT s.name sales_rep, a.name acct_name, r.name region FROM sales_reps s JOIN accounts a ON s.id = a.sales_rep_id AND s.name LIKE 'S%' JOIN region r ON s.region_id = r.id AND r.name = 'Midwest' ORDER BY a.name; - Provide a table that provides the region for each sales_rep along with their associated accounts. This time only for accounts where the sales rep has a last name starting with K and in the Midwest region. Your final table should include three columns: the region name, the sales rep name, and the account name. Sort the accounts alphabetically (A-Z) according to account name.
SELECT s.name sales_rep, a.name acct_name, r.name region FROM sales_reps s JOIN accounts a ON s.id = a.sales_rep_id AND s.name LIKE '% K%' JOIN region r ON s.region_id = r.id AND r.name = 'Midwest' ORDER BY a.name; - Provide the name for each region for every order, as well as the account name and the unit price they paid (total_amt_usd/total) for the order. However, you should only provide the results if the standard order quantity exceeds 100. Your final table should have 3 columns: region name, account name, and unit price. In order to avoid a division by zero error, adding .01 to the denominator here is helpful total_amt_usd/(total+0.01).
SELECT r.name region, a.name acct_name, o.total_amt_usd/(o.total+.01) unit_price FROM accounts a JOIN orders o ON a.id = o.account_id AND o.standard_qty > 100 JOIN sales_reps s ON a.sales_rep_id = s.id JOIN region r ON s.region_id = r.id; - Provide the name for each region for every order, as well as the account name and the unit price they paid (total_amt_usd/total) for the order. However, you should only provide the results if the standard order quantity exceeds 100 and the poster order quantity exceeds 50. Your final table should have 3 columns: region name, account name, and unit price. Sort for the smallest unit price first. In order to avoid a division by zero error, adding .01 to the denominator here is helpful (total_amt_usd/(total+0.01).
SELECT r.name region_name, a.name acct_name, o.total_amt_usd/(total+0.01) unit_price FROM accounts a JOIN orders o ON a.id = o.account_id JOIN sales_reps s ON s.id = a.sales_rep_id JOIN region r ON s.region_id = r.id WHERE standard_qty > 100 AND poster_qty > 50 ORDER BY unit_price - Provide the name for each region for every order, as well as the account name and the unit price they paid (total_amt_usd/total) for the order. However, you should only provide the results if the standard order quantity exceeds 100 and the poster order quantity exceeds 50. Your final table should have 3 columns: region name, account name, and unit price. Sort for the largest unit price first. In order to avoid a division by zero error, adding .01 to the denominator here is helpful (total_amt_usd/(total+0.01).
SELECT r.name region_name, a.name acct_name, o.total_amt_usd/(total+0.01) unit_price FROM accounts a JOIN orders o ON a.id = o.account_id JOIN sales_reps s ON s.id = a.sales_rep_id JOIN region r ON s.region_id = r.id WHERE standard_qty > 100 AND poster_qty > 50 ORDER BY unit_price DESC; - What are the different channels used by account id 1001? Your final table should have only 2 columns: account name and the different channels. You can try
SELECT DISTINCTto narrow down the results to only the unique values.SELECT DISTINCT a.name acct_name, w.channel channel FROM web_events w JOIN accounts a ON w.account_id = a.id WHERE a.id = '1001'; - Find all the orders that occurred in 2015. Your final table should have 4 columns: occurred_at, account name, order total, and order total_amt_usd.
  SELECT	o.occurred_at occurred_at,
  		    a.name acct_name,
       o.total order_total,
       o.total_amt_usd order_total_amt
  FROM accounts a
  JOIN orders o
  ON a.id = o.account_id
  AND occurred_at BETWEEN '2015-01-01' AND '2016-01-01'
  ORDER BY o.occurred_at DESC;
Recap
Primary and Foreign Keys
You learned a key element for JOINing tables in a database has to do with primary and foreign keys:
-
primary keys - are unique for every row in a table. These are generally the first column in our database (like you saw with the id column for every table in the Parch & Posey database).
-
foreign keys - are the primary key appearing in another table, which allows the rows to be non-unique.
Choosing the set up of data in our database is very important, but not usually the job of a data analyst. This process is known as Database Normalization.
JOINs
In this lesson, you learned how to combine data from multiple tables using JOINs. The three JOIN statements you are most likely to use are:
-
JOIN - an INNER JOIN that only pulls data that exists in both tables.
-
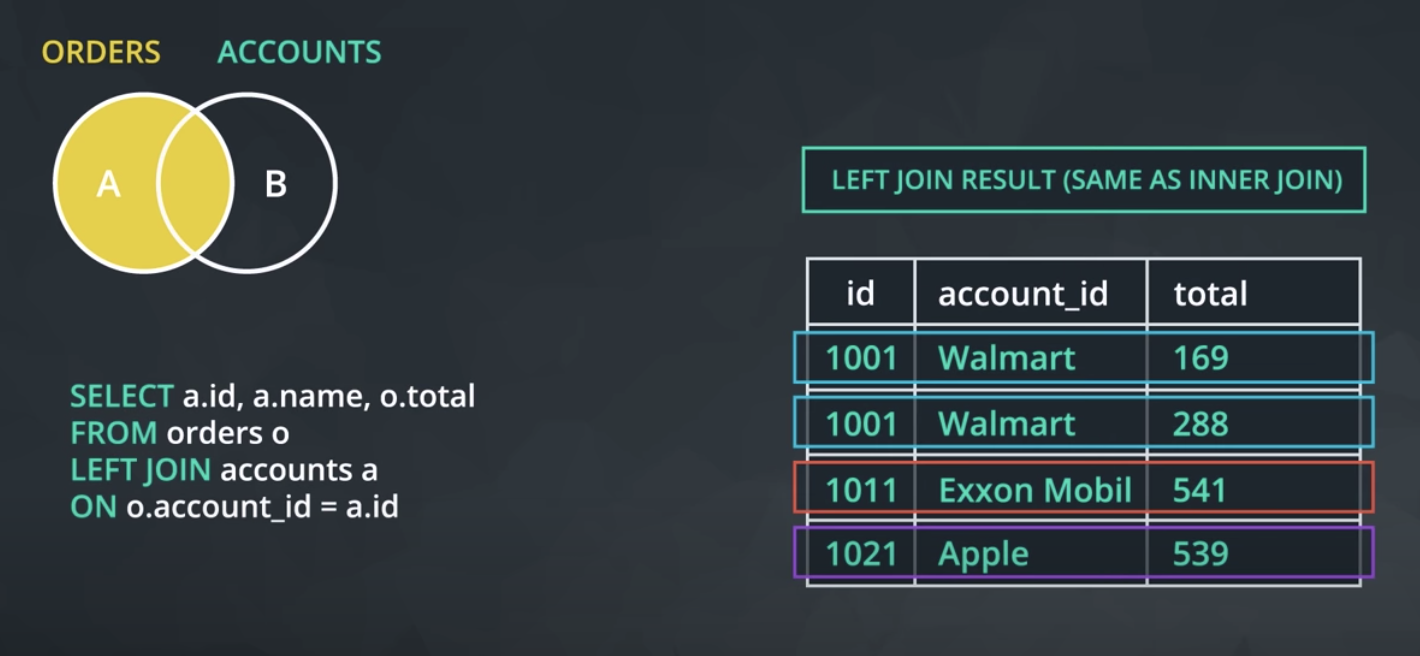
LEFT JOIN - pulls all the data that exists in both tables, as well as all of the rows from the table in the FROM even if they do not exist in the JOIN statement.
-
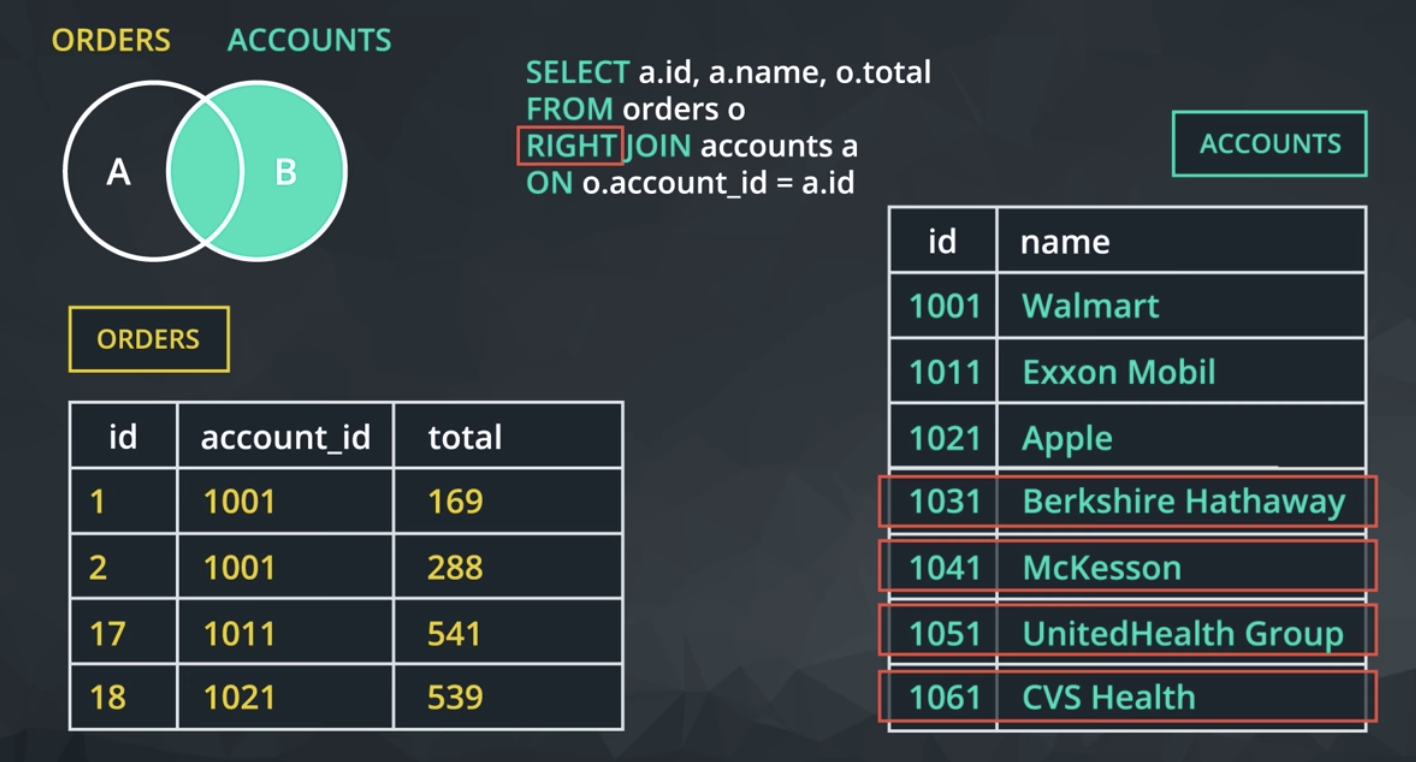
RIGHT JOIN - pulls all the data that exists in both tables, as well as all of the rows from the table in the JOIN even if they do not exist in the FROM statement.
There are a few more advanced JOINs that we did not cover here, and they are used in very specific use cases. UNION and UNION ALL, CROSS JOIN, and the tricky SELF JOIN. These are more advanced than this course will cover, but it is useful to be aware that they exist, as they are useful in special cases.
Alias
You learned that you can alias tables and columns using AS or not using it. This allows you to be more efficient in the number of characters you need to write, while at the same time you can assure that your column headings are informative of the data in your table.
Looking Ahead
The next lesson is aimed at aggregating data. You have already learned a ton, but SQL might still feel a bit disconnected from statistics and using Excel like platforms. Aggregations will allow you to write SQL code that will allow for more complex queries, which assist in answering questions like:
- Which channel generated more revenue?
- Which account had an order with the most items?
- Which sales_rep had the most orders? or least orders? How many orders did they have?